Thursday, July 26, 2012

Get Gutshot at Noble Knight Games

We want to say a big "Howdy" to our newest retailer, Noble Knight Games. Aaron and the fine fellas over there are now carrying Gutshot and -- for the first time ever -- our Deadwood miniatures and our Lethal Ladies Gunfighters miniatures. In short, they are carrying all of our Gutshot and Gutshot: Night of the Living Deadwood material.

Noble Knight is one of the coolest online stores we know of. Not only do they carry the latest games, but they also stock hard-to-find games that have been out of print for ages. Heck, they even have more than one copy of TSR's original Boot Hill game available (I'd snatch it up in a second if I had an extra $150 burning a hole in my pocket).

To visit them, check 'em out on the Web: www.nobleknight.com

To check out all our retailers, visit our Website: http://hawgleg.com/retailersList01.asp


PS: We just shipped our stuff to Noble Knight, so it may take a few days to show up in their catalog.


Saturday, June 23, 2012

Arnica: Some Adobe buildings go on sale next week


Just thought I would give you guys a heads-up and let you know that 3-5 of the Arnica Real Estate Adobe buildings will be available for pre-sale next week.

We will definitely have:
- Casa Uno
- Casa Dos
- Cantina

We will probably have:
- Adobe Church
- Adobe Storefront

Not sure about the Belltower.

Here's a list of the buildings: http://arnicarealestate.com/cart_catHome.asp?ppcID=2

New photos will be added as they become available.

As I said, we just wanted to give fellow TMPers a heads-up on this cool upcoming release.

Tuesday, June 5, 2012

Blog Update: Making a few changes

Back in February, I made a decision to start a Hawgleg Blog and update it twice a week -- Tues & Thurs. My goal (and this is one of the few times I'm saying "I" instead of "we," because this was something I wanted to do, rather than doing it with my partners) was to give you guys more of a behind-the-scenes look at what we're doing and what's coming next from Hawgleg Publishing.

My commitment was to try blogging for three months and see if it helped accomplish those goals.

Well... time's up and I'm not 100% satisfied with the results. I think the simple truth is, I've accomplished the quantity but not the quality. Keeping this schedule isn't really giving me the time to create high-quality content. At least not and let me focus on the other projects we're working on.

So, for now, I'm going to cut back to making posts when I've got something important or interesting to say. I still might manage once a week, but I'm not committing to a specific schedule. For the next three months I'm going to focus on Quality, not Quantity. Other than that, my goals remain unchanged: I want to give you more behind-the-scenes info and post Work In Progress images and material.

In other words, I want to make this blog fun and factual.

Thanks for your support so far, and see ya back here soon.

Thursday, May 31, 2012

Artwork Update

Today I took a break from a few things and decided to work on some artwork. I'm not really in love with the pose I selected, but that's not really the point. I was more interested in technique and working with the software today than in the final results.

Right now this is just a Work In Progress (WIP), but when I finish it this image will probably wind up in one of our books in the future.

Click to see full sized.

For this sample, I added the brown tint and the brown squares just to give it a sense of balance. The final artwork will -- of course -- be printed only in black & white.

See you here next week!

Tuesday, May 29, 2012

Arnica: Starting on the Adobe Buildings

Not much to report today, except to say that I'm starting work on the molds for the adobe collection. I think I'm going to start with the smaller buildings -- the Casas -- and then move up from there. If all goes well, I'll be posting some work-in-progress photos shortly.

Coming Soon!

Thursday, May 24, 2012

Shutting Down For Memorial Day

Liberty, Freedom and Honor...
To those who have paid for what we hold dear, we offer our heartfelt thanks.


Tuesday, May 22, 2012

Arnica Update

Very, very little to report today. I've been wrapping up the current orders so I can move on to making the molds for our Adobe Collection. I think all the orders we have on hand will ship before Saturday.

I also spent the day cleaning out a room in the house so I can move my production into it. This will be a big boon to improving our speed.

More on Thursday!

Thursday, May 17, 2012

Showdowns & Shootouts Update

As I mentioned Tuesday, I've started making some preliminary cover sketches for the cover, and I've started work on the interior pages templates. Next up, moving the individual adventures into the book itself.


Why Release an S&S Book?
Mostly it's so we have something extra to give to the people who took the time and effort to submit the adventures. But there's something more.  I like books.

I like that they are permanent and are not dependent on technology to read. Everyone thinks a PDF is a a permanent format, but let's be honest. That format could be replaced tomorrow and be out of fashion in 10 years. That would mean all those existing PDFs would be dependent on a defunct technology. Is that likely? No. Possible? Yes.

So, that's another reason I like books. Plus, as a hard copy, it will work when technology fails (nothing worse than having your tablet run out of power while you're running a game -- paper never runs out of power).

Finally, books are still cool and they look great on your book shelf.

However, we're probably not going to stick with just a book. Even as we keep the original adventures online for free, we're going to experiment with having the collected PDF available for a very small price online (probably through DriveThruRPG.com). Both the printed and online books will have a little additional material:

  • Summary sheets of new Specialties that are introduced in the adventures
  • Summaries of new vehicles (raft and mule cart)
  • Summary of the new tables for random weapons and random lawmen
  • New Random Character Generator
  • Index
  • Some other fun stuff
This info will be probably be added to our Downloads section at the Website (which means it's free).

As you can see, the goal of the S&S book is just to collect the material, not make a lot of money. Still, if we sell a few hundred copies... well, I don't think anyone here would complain!

Talk to ya'll next week!


Tuesday, May 15, 2012

Showdowns Shootouts: Book Cover Ideas

I've been busy with Arnica orders the past week, but I did take a few minutes out to sketch up a few ideas for the cover of the upcoming Showdowns & Shootouts book. For this one I was just picturing a simple brown background with the cover thumbnails on it.

Click on image to see full-sized.

But my second thought is more elaborate, including a 3D image like more of a table with a gun and the cover thumbnails spread out like wanted posters. I might bring back in the 3D whiskey bottle I did for April Fool's Day (I like the way it looked and it could fit nicely in this image).

Click on image to see full-sized.

I'm leaning a lot more toward the second image, but I would need to work the authors names onto the cover. I'll keep you posted about which way I go.

Talk to you again Thursday.

Thursday, May 10, 2012

Update: Arnica and Hawgleg

Still working to catch up on things. Things are still in flux this week, as I had to cancel all work because our A/C went out and we decided to spend the night with our in-laws. Our A/C guy got things working, though, so I'll be back at work on Friday.

We're still working on repairing molds (I replaced part of the mold for the Attached Shed Kit -- the window next to the front door had torn). One of the molds I'm interested in pouring is another set of boardwalks. Increasing our capacity from four to six will do wonders for productivity.

In Hawgleg news, I'm still getting into the Showdowns & Shootouts book. Progress is slow because I haven't been able to devote a large block of time to it, but it's definitely progressing.

Talk to you next week!

Tuesday, May 8, 2012

Arnica Hawgleg Update

Not much time for a report today. I did a lot of resin casting over the weekend to fill some orders. I got most of the work done needed to finish out the next two orders in the queue. Those will ship shortly. Plus, I've already got a head-start on the orders after that.

When we started the store, we had about a 3-week period between order and shipment. That's slowly decreasing to about 2 weeks. We're not there yet, but will be soon.

Arnica Saturday Update: Last Saturday was one of the busiest days in casting I've had in a long time. I poured about 5.5 pounds of resin (that's 8 cups, or about 2500 grams). I poured one of everything, except the Mercantile walls because I already have as many of those as I need for the moment.


Hawgleg Update: I've started tentative work on adapting the separate Showdowns & Shootouts adventures into a cohesive book. Since the material has already been written, edited and laid out, there's not a lot to do, but a few of the graphics need to be modified for printing to make a more attractive book. Plus, there will be a few small extras in the book (not a lot, but a few summary pages of the new Specialties, weapons and so forth). If all goes well, this book could be done by the end of the week. Of course, that depends on whether or not I can decide on what I want to do for the cover.

Talk to ya'll again Thursday.

Thursday, May 3, 2012

Arnica Sneak Peak: New Shed Design

Not much to report right now. My thumb is getting better and I've resumed my normal work schedule of casting parts and tooling (i.e. sanding) them. Orders are shipping and things are moving forward. The position of the cut does make it hard to mix mold rubber, though. Silicon rubber is very thick and holding the mixing rod puts a lot of pressure on my thumb -- exactly on that cut. So I won't be making any new molds for a few more days, yet.

When it heals I'll be focusing on making replacement molds for a few damaged parts, as well as making extras of key parts (like the wall of the bank, for example -- right now I've only got one mold for both walls and a second wall would really come in handy). After that, I'll move on to making some new molds for some new buildings, including the long-awaited Adobe collection.

We'll also be offering a new building for a set of original designs I've started working on: The Miner's Camp. You see, when we add the adobe buildings to our set, we'll have most of the major buildings that you need to create a nice Western town. The keyword being "nice." I'd like to add some more buildings that aren't so nice, nor so big. In other words, I want to create a set of small shacks and shanties like those you might find in a mining camp.

Here's a look at the first building I've designed (which, obviously, is based on our current Attached Shed).

New Shed Design
This photo shows the master pieces glued to a board that will serve as the basis of the master mold. As you can see, it will have a slopped roof with one end higher than the other. I'm hoping this will create a dramatic profile when compared to the other buildings in the town. Also, the flat roof (to the left) could serve as a place for outlaws to wait while ambushing people -- if the slope doesn't prove too steep, that is.

I'm also hoping that this model will offer a little variety to the various board & batten buildings we currently have. Also, it's a very small building, so it's low cost should prove to be popular. I've no idea yet when this will be released, but probably sometime this month. I'll keep you posted.

Remember, you can buy all of our Western Buildings at the Arnica Website.

See ya back next week for more behind-the-scenes fun.

Tuesday, May 1, 2012

Arnica: Ouch!

Dagnabit. I can't believe that such a minor injury threw off my work schedule today. I cut a big gash in my right thumb, about an inch in length and fairly deep -- probably a bit more than 1/8 inch at its deepest point. And, naturally, I got it doing something fast and stupid. I had just finished pouring some Arnica buildings and had prepared lunch -- a simple can of soup -- and noticed that the garbage needed to go out. It was overflowing the can, so I reached in to push is down and sliced open my thumb on the soup can lid.

Like most deep cuts, it didn't hurt much for a second, but then the blood came gushing out. I let it bleed then washed it and wound up applying direct pressure for about 10 minutes to get it to stop bleeding. I then washed off the caked blood -- which started it bleeding again -- but finally got it all under control about 30 minutes later. Oh, and I cleaned up the blood on the floor, too.

It hurts a bit, but the problem is that it's in a bad place on the side of my thumb in a place that is used to grip tools, pencils, and other items. So when I tried to get back to work an hour later, I just opened it up again. Since I'm not on the TV show Chopped, I don't need to work with a latex glove to hold the blood while I'm working, so I finally just called it quits for the day.

I'll get back on things tomorrow, as I can already tell that it is not likely to reopen again. But, alas, I am more than a half-day's work behind.

BTW: No, I won't post a picture of it. I've been told such things gross people out.

Coming Soon
Rather than just spend the whole column complaining, here's a photo from the upcoming tutorial on how to assemble one of our Gunsmith Shops. The key is to put the front and back on the outside and put the side walks flush with the other two.

Gunsmith Shop: Under Construction

I'll clear it all up in the tutorial that takes the building from kit pieces to finished, painted building. That probably won't make it here on Thursday, but sometime in the future. Remember, you can buy this (and other) buildings at: www.arnicarealestate.com.

See ya Thursday

Thursday, April 26, 2012

Arnica: Sneak Peak Behind the Scenes

Not much time for blogging today. I'm busy pouring resin to fill orders, as you can see from these pictures of what I poured last night.


Here are the molds filled with tan resin on my work table last night. As you can see from the empty cups, I poured four cups of resin,. Each cup is 300 grams, so that means I poured 1200 grams of resin. That's about 42 ounces of resin, or about 2.5 pounds.


Here's the rest of what I poured. Today I will de-mold them and then store the pieces until I can sand them, which will probably be on Sunday. My goal is to pour about this much again tonight. In fact, I'm off Friday, so I will probably do an afternoon pour of roofs and extra bits that we like to keep on hand.

See you back here Tuesday

Tuesday, April 24, 2012

Cool Tool: Booklet Creator

Sorry to delay the Arnica news, but I've been busy this weekend with my day job (Technical Writer for various Oil & Gas companies) and I needed a specific tool for a specific job that might actually have some use in game development.

Sometimes I need to create Saddle-Stitched Booklets for game props or prototypes. Now, a saddle-stitched book is basically a magazine. It's a set of pages stapled in the middle and folded like in this picture.


It's called a "Saddle Stitch" because it looks kind of like a saddle when you hold it up by the spine it bows out a saddle. It's nothing particularly special, but the pages need to be arranged in a specific order to get the booklet to print correctly. Here's how the pages normally look, one after the other:


In this case, I made the odd-numbered pages blue so they will stand out more in the next picture. As you can see above, this is nice, normal and orderly. The pages are perfect for when you're printing the pages to staple together in the upper-right corner, but not so great when you need a booklet. Booklets have a special page order so that they will print correctly. Take a look at what I mean below. 


Pages organized like this
are called SPREADS
To make an 8-page booklet, you need two sheets of paper. When folded in half, that yields 8 pages because there are two pages per side of paper (2 x 2 x 2). This is also why all magazines MUST have page counts that can be divided by 4. If you ever think you've found a saddle-stitched document that is not divisible by 4, then you've probably miscounted because you're letting the cover or a "blank" page throw you off. This is one of those laws of physical reality: Unless you have tipped in a page and are holding it in place with glue or some other odd technique, then you MUST have a page count based on the number 4.

 It all makes sense if you look at them spread out below -- when you do you can see that this is a little more complicated than just putting the pages out and hoping they will fall into the correct order.


The Right Tool for the Right Job
Reordering the pages and resizing them in something I can do easily if I'm printing from a hgh-end page design program like InDesign or QuarkXPress. Both of these are industry-leading tools and have those tools built right in. These are great time-savers when I use those programs to create my documents.

But what if I'm using Microsoft Word or PowerPoint? Most of the time I just fall back on the "Booklet Setting" built right into my printer. It's a great little feature in my Brother 4070-CDW color laser printer. BUT, it resizes the pages when it does it, usually by shrinking them. This is great for proofs, but not something I need to take to a print shot.

For this one task, I found a great little tool that I wanted to mention: Booklet Creator. This is a simple application that does one thing and one thing only: It does the following:
  • It takes an existing PDF document
  • Resizes the pages if needed
  • Reorders the pages (definitely needed) 
  • Outputs the finished spreads so you can print them at home or professionally
This program has only one screen as an interface. You pick your input file, make a few minor decisions like page range or or output page size (I left it on auto for my first job and it guessed correctly that I wanted to take my 5.5 x 8.5 inch pages and output them to a single sheet of 8.5 x 11 letter-size paper).

In other words, this program is a one-trick pony. It does one thing, but from what I've seen, it does it VERY well. If you read this review and are thinking that you can't picture when you would use this program, then you're right: You won't use it and you won't need it. But, if you're reading this and are thinking this sounds like something you might be interested in, then you're probably doing some print jobs where this will come in handy. If you're in the latter camp, I suggest getting this. It does what it says it does and at a very reasonable price.

This program is available for both Windows and Macs. I'm running it on Win7 64-bit. Get it for only $19.95 from the publisher: http://bookletcreator.com/  I downloaded the trial (which only does a 16-page sample document, but does not add any watermarks or text that I could see). I bought it and was e-mailed the registration/unlock code in less than 5 minutes.

By the way, if you're interested in how to saddle-stitch a booklet without a long-reach stapler, I wrote instructions about that for Mike's Workbench over at the Hawgleg Website: http://hawgleg.com/columns_detail.asp?CatID=2&ColID=67

See you back here on Thursday, amigos!

Thursday, April 19, 2012

Arnica: Lights, Camera... Bubbling Rubber!

I've been busy this week on all things Arnica Real Estate. Not only did I get the new mold for the Boardwalks made, I also made a replacement mold for the side walls to the board & batten buildings. These molds got ripped to shreds last Christmas. One wall went because of malfunctioning mold release agent and the other went due to an error mixing resin. Mostly, though, they went because they were old and had outlived their capacity.

While I was making that mold, I whipped out my trusty camera phone and shot a short video of what the rubber looks like while we're sucking the air out of it in the vacuum chamber. It's not much of a video (just 2 minutes), but I think you'll all get a kick out of watching the rubber bubble around as it "came alive."


If you'd like to watch it over at YouTube, Click Here.

More About Molds
You see, molds don't last forever. As they age they get brittle and lose the slickness that is necessary for the easy removal of the cured resin. Without this slickness, the mold fails and tears when you pull out the finished piece. One question that's been asked a lot is, "How long do these molds last?"

The Arnica Work Table
Well, pilgrim, there ain't no good answer for that. You see, we use different types of silicone mold rubber and they each have different properties. As you can see in this picture, we use three types of rubber: purple, green and yellow.

Yeah, I know it's more of a teal or a turquoise or soa foam... I'm a guy working with chemicals and power tools. Right now, I'm just going to call it "green."

Each of these is slightly different. The yellow is made by a major company called Alumilite. We use their Quick Set Mold Silicone which sets in about half an hour (and completely solidifies in 4 hours). This is a good, fairly stiff rubber that is good for holding details and is justly famous for its long-life and durability. It's a bit expensive (the boardwalk mold had 410 grams of rubber and cost about $20 to make). That might not sound like much, but when you consider we've got 40+ molds... well, it adds up. We also have to be careful of that stiffness, as it can make it harder to de-mold smaller parts.

A look at the pump and the pot (vacuum chamber)
The Green is the 2125 from MPK Enterprises. The company is run by a guy by the name of Mike, and he's one of the nicest and most helpful guys out there. You can reach him through his site at www.hobbysilicone.com. This particular silicone rubber is very flexible which makes it ideal for small parts like the awning posts you can see in the photo above. It also has the advantage of holding details very well. In addition to small pieces, we use it for some of the roofs, as the flexibility makes it easy to de-mold the large flat panels. Finally, it only runs about $10 a pound, so it's less expensive than the Alumilite. 

The purple is the pleased spiritualist -- er, I mean "happy medium" between the two. We use MPK's Extra-Firm 135 because it's more flexibile than the Alumilite, but more rugged than the green. If I had to pick just one rubber to use for all occasions, I would choose the purple. Fortunately, I don't have to pick just one. As with any job, you need to use the right tool for the task at hand. Figuring out which rubber matches which mold master is a bit of an art, but I'm getting better at it.

Just as there are different molds for different situations, we use different resins for different applications. Come back next week and we'll talk more about why sometimes we use white resin and sometimes we use tan.

See ya then, amigos!

Tuesday, April 17, 2012

Arnica: Making a Replacement Mold

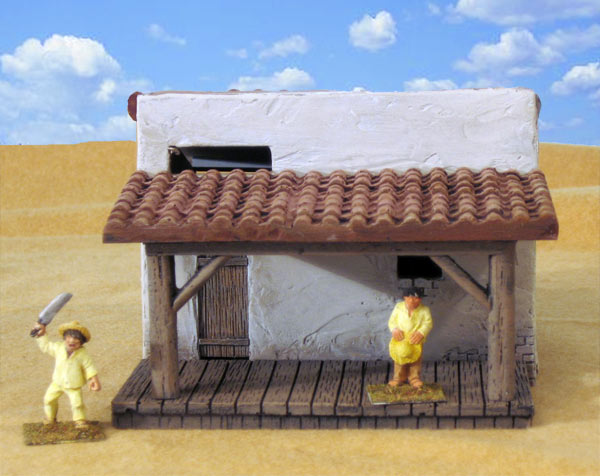
In case you didn't know, Hawgleg Publishing also manufactures and sells resin buildings to use while playing Gutshot. We sell these buildings under the name Arnica Real Estate (we inherited the name when we bought the Arnica line of buildings from Mark McGraw a few years aback). You can see the complete line of buildings over at www.arnicarealestate.com.

Right now we're only offering buildings from our Western Collection: http://www.arnicarealestate.com/cart_catHome.asp?ppcID=1  But I hope to start making some molds for the Adobe Collection later this week. Mosey on by the site to check out what we've got ready and what's next on the list.

Making buildings takes a lot of time and energy, as well as some specialized equipment. This week we launched a new Spring Reopening, so I'm working to fill orders and to replace some molds that have been damaged over the last year. One of the most important molds (at least in terms of sales) is for the boardwalks. There are three to a pack and, up until now, I've been operating with just two molds, and one of them actually tore across the bottom but is still usable. But, the truth is, it's gotten a bit rough and it needs to be retired. So, I need to make a new mold that will let me pour two boardwalks at a time (and with the other good Boardwalk mold I still have, I'll finally be able to pour a whole set at a single time).


Here's a quick photo strip of what I did tonight while making a new mold for the Boardwalks:

Two resin masters glued to a board.
First I prepped the masters. They were already attached to the masonite board, so all I had to do was seal the edges.

You see, if there are any gaps between the resin master and the board, the rubber will seep into it and make it very hard to pull off the mold rubber after it solidifies.


Painters Tape seals it, the walls add structure.
The next thing I did was build a mold box around the masters. Now, I'm bound to get some criticism form people for how I do this. I know most people use wooden boards and either clay or epoxy to create the walls around the masters. That's not how I ride, pilgrim.

I use 3-inch wide painters masking tape to adhere 1-inch thick Styrofoam blocks around the masters. These form the box walls.

I use this method because the Styrofoam is light, but at this thickness won't bend or bow against the weight of the rubber once the box is full. The painters tape forms a perfect rubber-tight seal (I use special corner joints to make sure there are no gaps at those crucial points).

Be careful to brush into the wood grain.
Once the box is built, I then heat Petroleum Jelly in the microwave oven for about 5 minutes at 70% power. This softens it enough to make it easier to brush on.

I cannot stress the importance of this step!

It is absolutely VITAL that every tiny bit of the master is coated with a thin layer of petroleum jelly. If the layer is too thick, you'll lose the wonderful detail in the wooden planks of the boardwalk. If it's not thick enough, though, the rubber will probably tear during the de-molding step (which we'll look at on Thursday), thus wasting your work and your mold rubber.

No kitchen is complete
without a vacuum pump!
It's also important to coat the tape on the walls and the bottom of the mold. If you don't, tearing will almost certainly be in your future.

I took a picture of the next step, but you can't see it clearly enough to make it worth the effort to post it. The next step I take is to put a small 1/2 inch square wooden dowel along the edge of the box and mark a line with a pencil. I then put another one on top of that and mark again. This gives me two continuous pencil lines around the inside of the box to act as guides when I level the box after its full of rubber. I also use this line to make sure that my molds are at least a half-inch thick. Any less than that an there is a significant risk of tearing the mold as you work with it.

Next up, I get out the mold rubber (in this case, Alumilite Quick Set) and mix it according to instructions (I'll discuss this more at a later date). Then it goes into the Vacuum Chamber. This is a vital step because mixing the rubber introduces a lot of air into it. Air can lead to bubbles which can lead to ruined molds. Our Vacuum Chamber is not your typical kitchen food-saver. This is a powerful 1/3 horse power motor capable of creating a pure vacuum.

In a vacuum, no one can hear you bubble.
Once there is no air in the aluminum chamber, the mold rubber loses its surface tension, rises up about 2 inches and begins to "boil."


This is a COOL thing to watch. The thick goo looks a lot like pancake batter (with this rubber, it's particularly pancake-like because of its color and the way the bubbles pop on the surface). The bubbles keep roiling about until I finally break the vacuum and let the air back into the chamber. I actually took a video of this through the top of the chamber's clear lid. I'll post it to YouTube some time in the future.

By the way, yes that is dried resin in the bottom of the pot. I had an accident two weeks ago and the boiling resin overflowed the cup. I keep meaning to clean it up, but I keep getting sidetracked.


It must sit flat.
After the resin has been degassed, I pour it into the mold box. The painters tape ad the Styrofoam walls hold up perfectly. Sorry I don't have any photos of me actually pouring the rubber, but it's sticky and I needed both hands to get the rubber into the box. In other words, I didn't want to get sticky rubber all over my camera phone!

Also, the pencil lines I mentioned help me level the mold as it cures. This particular type of silicon rubber takes about 4 hours to cure. However, I prefer to let it set for at least 12+ hours before I consider demolding it, and I won't use it for 24-48 hours, as that helps it cure more thoroughly.

It is very important to level the mold as the silicon rubber cures (i.e. hardens). If you don't, then the mold will be lopsided and every time I pour resin into it the final items won't be flat: one side will be thicker than the other. And that, of course, just ain't how we roll. The final step is to use a vibrator (the big type for your neck or back) on the table to help it jostle loose any bubbles that might be trapped below the surface. This is just a precaution as the degassing step removed most of them. This last vibro-step is "just in case" some air got caught beneath the undercut of the edge of the boardwalk.

If you'd like to take a gander at what we're going to make with this mold, you can see (and buy) it here: http://www.arnicarealestate.com/cart_detail.asp?ppID=22


See ya Thursday for the demolding, and the first pour!

Thursday, April 12, 2012

Arnica Store (briefly) open...


Howdy from Arnica!

You’re getting this email because you have ordered from us in the past or you have asked to be placed on our mailing list.  If you’re the former, thanks amigo! If you’re the latter, then welcome aboard!

I wanted to let you know that we’ve opened the shop for a few days to clear out some inventory (we made some buildings for a convention that we wound up canceling), so we have some pieces ready. We’re also ready to buy some more rubber so we can cast some new molds. Our plan is to duplicate the existing molds and ship them to Murphy so he and I can share the workload and, thus get more buildings out there. Plus, if he’s filling orders then I can focus on getting new stuff ready. This process is long overdue

The shop is open right now to accept orders. Every available item has a “Buy Now” button in front of it.

FAIR WARNING: There’s nothing new from the last time you ordered (sorry, but there are no adobe buildings available yet). I just wanted to give you first crack at ordering before we announce it to the general public.

Mike Mitchell
Hawgleg/Arnica
www.arnicarealestate.com

PS: If you have a discount coming to you from a previous order, please do NOT use the shopping cart to check out. Just send me a list of what you want and I will then send you a custom invoice from PayPal. It’s the best way for me to include your discount.

Tuesday, April 10, 2012

S&S: And the Winner Is...

Well, this is certainly a first. I'm actually announcing news here at the Hawgleg Blog before it hits the front page of the Hawgleg Website. The winner of the Jury Prize in the Showdowns & Shootouts contest is none other than our good buddy, Dan Hash for his great adventure, Hurrahin' The Sky Pilot!


Now, before yuh go gettin' any ideas about us playing favorites, keep in mind that a whole bunch of those fellas in the contest are our saddle pals. Hheck, Richard Nelson even played Gutshot in some of the very first playtests we ever ran, and so did Dion Duran for that matter -- and at the time he started, he could barely see above the table. Now he's heading off to college this year or next! It's amazing how much 10 years can change a boy, ain't it?

Dan Hash won by three votes (28 to 25). His victory didn't surprise us too much, as he got an early start, but other folks started catching up on him and, to be honest, at the end there we weren't sure who was gonna cross the finish line first.

We'll talk more about Dan's victory in a day or so, and give yuh a peek behind the scenes as to what went into his adventure (we used it to debut a new Specialty called Fight to the Death that will make it into the next edition of Gutshot).

See yuh back here on Thursday!

Thursday, April 5, 2012

WIP: Waiting for the Jury Prize Announcement

I had originally planned to announce the winner of the Showdowns & Shootouts Jury prize selection today, but that is not to be. As you will recall, the voting on the contest closed this past weekend, so we had our winner. It was actually a fairly close race, with the winner being decided by only three votes!

We sent an email to the winner but we haven't hear back from him. Since we don't want him to read about this before we've personally contacted him, we're going to put off this announcement until next week.

In the meantime, here's a sneak peak at the Work In Progress (WIP) illustration that will run with the story. Once again, I'm using Strata 3D CX6 to create this image. BTW: You might recognize the cowboy on top of the trophy as being the miniature that was in the bottom of last week's whiskey bottle image.


This image is still very rough (and, of course, I removed the winner's name from the plaque). So far, I'm mostly happy with the design (which, I must admit, is loosely inspired by my own Origins Award sitting on a shelf in my office). So far, I like the general shape, but there are some technical issues I need to resolve to make the image look better. For example, flat surfaces do not really look great with reflections. They tend to look lifeless and uninteresting. I may need to add some curvature to the name plaque, or get creative with my reflection maps in order to make this work.

Anyway, hope you enjoy this sneak peak of this image. Oh, and if you're interested in this sort of thing, here's a wire frame view to show you what the image looks like as raw geometry without the pretty textures applied. As you can see, there is a lot of detail on the cowboy figure, which was actually exported from Poser and placed in Strata 3D. It actually has a lot more detail than I need, but I don't feel its worth the hassle it would take to create a good, lower-polycount version of the model.

See you next week when we finally reveal the winner's name.

Tuesday, April 3, 2012

Gutshot Rotgut: Our Annual April Fools Joke

Yesterday was April Fools Day, and as I explained last week, I enjoy creating pranks for the holiday. Since 2006, Hawgleg Publishing has honored the spirit of the day by announcing the release of a fake product.

This year, our product was gaming-themed whiskey. That is to say, a boutique line of whiskey with a 25mm Western miniature in each bottle. We release the story at our Website (www.hawgleg.com) and TheMiniaturesPage. The story is a bit naughty, but for the most part it's workplace safe -- and it was a BIG hit at TMP. In fact, since April 1 fell on a Sunday, we were apparently the only company that took the time to create a joke (some years at TMP, there are easily a dozen fake products, but this year we were the sole provider, which actually helped us pull the wool over people's eyes more effectively than usual).

I also think the quality of our artwork helped sell the joke:

I created this image in Strata 3D, which is a 3D illustration program I've been working with for a long time (probably more than 10 years). It's a powerful, but lesser-known tool with a lot of horsepower there waiting to be unleashed -- as I hope you can see in these images.


I think this time I came very close to achieving photo realism with these images. They're not quite 100% perfect, but they definitely do a good job of looking like real product artwork. I also got several complements on the quality of the label:


I even had a few people ask for a full-size label so they could print it out and put it on their own whiskey bottle. As one guy said, he wanted to see if anyone would notice. If you'd like to see the full-size label, you can get it by clicking here. I wish I could take all the credit for the label, but I did start off with an existing label from a Chivas Regal bottle. You can compare them by clicking here to see what I started with.

See ya Thursday!

Thursday, March 29, 2012

Gutshot Rules: Knocking the rifle off its throne

As I said last week, we solved one of our biggest problems in the first draft of Gutshot by arguing... er, discussing & debating outside Midnight Comics one night after a game. We invented the Retaliation Shot as a mechanism to solve one of the biggest problems we were having in the game: The fact that, because of our random initiative system, it was possible for you to die without ever firing s hot in self defense.

The Notorious Midnight Riders -- our first
long playtest that helped shape the game
into what it finally became.
Reaction to that rule has been mixed, with most of it being positive. There are a small, vocal group of people out there who don't like it at all. Of course, these are the same people who would prefer that everyone write down their actions and display them at the same time and then act them out simultaneously. In other words, these are old-schoolers from the "orders" style of gameplay used with armies and divisions. This is absolutely, 100% not the type of game we wanted to make. Gutshot is a skirmish game, and that sort of detailed order-giving has no place in the undisciplined, wild-n-woolly world of Western gaming.

Another group that dislikes this mechanic is people who have never actually played it. Although we've written and re-written it more than once, it just doesn't sound like it will work as well as it does when you just read the words. It seems a bit... odd, or different to them. When they play it, though, most of them join the the people who love the Retaliation Shot because it does a whiz-bang job of fixing the imbalance caused by our chaotic initiative system.

Taking the rifle down a notch or two
From Bushwhacked in Beaver Creek!
But back to the rifle. As I said Tuesday, with the way the first draft of rules was written, there was no reason on god's green earth not to choose the rifle as your primary weapon. It had damage, range, and held 15 rounds. By any reckoning, it was the weapon to beat.

So, we had to do some things to make it a more balanced weapon. The first thing we did was eliminate the "to hit" bonus at point blank range. The rationale behind this is sound, but most people don't like it: We figure that if you're bringing a rifle right up to a fella with intent to shoot 'em, they will grab the barrel and try to shove it away or dodge it in any way he can. It's a simple idea, but it helps a lot.

The next thing we did was more severe: we made it impossible to draw and fire a two-handed weapon in the same Action. This had a profound effect on the game. Suddenly rifles and shotguns -- still the most powerful death dealers in terms or range and damage, respectively -- were more unwieldy than the nimble Colt revolver or the sneaky Derringer.

This was an amazing change to the game balance, and the point at which we realized -- over the next four or five playtests with the Midnight Riders -- that we were really on to something great! Suddenly the combat was more balanced and players had a reason to think about their weapon choices. Now we could turn our attention onto other issues.


Tuesday, March 27, 2012

Gutshot Rules: Retaliation Shots

Most of the time when you're working on a game as big as Gutshot, you don't exactly remember when and where certain rules came from. In the case of the Retaliation Shot, however, I remember when, where and -- most importantly -- why this rule came to be.

I recollect that it was a relatively mild summer evening in 2003. Paul Mauer and I were standing outside Midnight Comics in Houston, Texas. It was probably nearing 1 a.m. We had just finished running one of the highly successful playtests with the group known as the Midnight Riders. Now, the store was in its second location next to the Laser Quest and we were standing outside discussing and debriefing that night's game.

I couldn't tell you exactly which game it was without diving back into my notes, but it was probably somewhere around game four or five: Buzzard Bait at Buzzard Point! or Bloodbath in Rio Gato! Even though the night air was relatively cool (for Houston in the summertime, that is), our discussion had heated up.

You see, we had a problem. More than that, there was something seriously broken in this version of the game. Right now, the "Rifle is god," as Murphy had put it. Under that draft of the rules, there was no reason on earth to select any other weapon but the rifle: it had range, it had a 15-shot magazine, and it dealt a wicked load of Damage that was only topped by the super-deadly shotgun. And we had another problem: because of our random initiative system, it was possible to die before you had a chance to fire your weapon, even when someone was shooting at you. In an IGOUGO game, you can't really do much until it's your turn (after all, it is I go, you go... you know?).

I also recall that Rio Gato was the game where it really came to head about how I was adamant that you could not split your movement: In other words, you can't move half, shoot, then finish moving. You need to move/attack or attack move. But that's another topic for another time.

The fact is, Paul and I were hot and upset because we each had different ideas on how to handle the dying-before-you-move and the rifle problems. We each suggested and then shot down each other's ideas until, at last something emerged: a slight break in the armor of the IGOUGO rule allowed for the person who is being shot at to instantly shoot back. Suddenly a light went on over our heads. This resolved the first issue, and (as it would turn out), this small change made the games deadlier and move faster.

I went home and wrote up some notes about the proposed change, and after much mulling it over, decided to call this mechanic the Retaliation Shot. Here's the actual text of the rule that wound up in the Gutshot Core Rule Book:

10.5 Retaliation ShotIn general, when someone purposefully shoots at you, you may instantly shoot back with any ready weapon (see below). This return fire is called a Retaliation Shot and it is the only time you get to pull the trigger during someone else's Action.
A ready weapon is a weapon that is loaded and in your hand at the moment you were shot at. This includes all derringers, pistols, rifles, shotguns, and sawed-off shotguns. You may not draw the weapon or pick it up off a shelf (as in a siege situation). It must be in your hand, ready to be used when someone purposefully targeted you.

There's some more text to explain certain limitations, of course. You can't use melee weapons, Two-Gun Shootists only get one Retaliation Shot, the weapon must have ammo in it, and so forth. The book also stresses that this is an optional shot. When someone shoots at you, you don't have to shoot back. Why wouldn't you, you might ask? Obvious things come into play: the shooter is out of range (he's got a rifle and you've got a pistol), or you just don't want to waste the bullet. I've also seen players balk at taking the shot if they can only hit their target with Boxcars. After all, statistically speaking, you've got as much chance of rolling Snake-eyes as you do of rolling Boxcars.

And trust me, that does happen!

Another interesting thing came out of this rule: We decided that all Damage is applied at the end of an Action. "This means that it’s possible for someone to shoot you and do enough Damage to kill you, yet you would still get to retaliate.  And if ya do enough Damage to him in return, you might even take yer killer with yuh! Honestly, we’ve seen it happen plenty of times."

We quickly realized that this helped us recreate one of the classic elements seen in countless Westerns: Someone is blasted away in a hail of bullets, only to turn and manage to squeeze off that final, heroic shot at his killer, taking that varmint with him! It's classic, it's dramatic, and we love seeing it in a game.

So, this one night of bashing ideas back and forth with each other really helped shape Gutshot and turn it into the game it is today.

Mosey on back Thursday and I'll tell you 
how we finally solved the "Rifle is God" problem.

Thursday, March 22, 2012

Gutshot Rules: Behind our random Initiative

As a game designer, I think one of the most important things you can do is to impose a sense of balance into the game mechanics. For every plus, there must be a minus. For everything that gives you power, there must be something to counteract it. From time to time I'm going to use this blog to explain some of the behind-the-scenes thinking that went into fine tuning some of the rules in Gutshot.

For example, here's a question I get asked at conventions a lot:

"Why do you guys use random initiative? Why not just roll dice or draw cards and let everyone go in order?"

A fair question, and one with a very simple answer. But first, for those of you who are not that familiar with our game, here's an explanation of how initiative works in Gutshot:

  • Each player creates a character and fills out a Character Sheet. Every character must have a name (sorry, but "Cowboy #1 in yellow shirt" is not a name)
  • Each player writes the character's name on three slips of paper
  • All the slips are placed into a hat or other suitable container (I actually had to stop using my cowboy hat because name slips kept getting caught under the rim -- nowadays I use the old gamer standby: the Crown Royal bag)
  • One at a time, a name is pulled from the hat/bag: the character named then takes his action (usually movement and shooting at someone)
  • This goes on, one at a time, until the hat/bag is empty. When that happens it is the End of the Turn.
  • Refill the hat/bag with the names of surviving characters and keep on repeating until the end of the game.
Every Gamer's Friend
Now, even a quick reading of that should make it apparent that your name is going to be pulled out in a completely random manner. You might even have two Actions in a row... or all three at the end of the Turn. Critics of this system argue that this cuts down a LOT on planning and coordination because you can't easily predict exactly when a character is going to have his name drawn. And that, saddle pals, is exactly what we like about it!

Let me go back in time and set the stage for you...
Way back in 1999 and 2000 when Mike Murphy sent me the first drafts for this game, I was NOT impressed by the initiative system he described. I came from a long and checkered past as an RPGer (D&D, Vampire, etc.) and I was used to the simple: "roll dice and let's go in order" method of doing things. Murph strongly suggested I playtest it the way he wrote it... and I did. And I wasn't super impressed for a few reasons, the main one being that it was possible for me to die without ever firing a shot or moving to defend myself. So, naturally, I tried it again with a simple, orderly initiative system. And it worked... but too well.

Now that the players knew who was going when -- and more importantly, that everyone would only get one Action in a row), they suddenly started using modern combat tactics like advancing in waves and securing entry/exit points. It was highly efficient... and not at all a Western. That type of initiative was just too predictable, which is why we went back and figured out how to fix the I-never-even-got-to-move-before-I-died problem.  This improvement would end up being The Retaliation Shot...

And we'll talk more about that next week.

Tuesday, March 20, 2012

S&S Voting Report

This weekend we passed the halfway point in our month-long Showdowns & Shootouts Jury Prize selection process. So far, response has been about what I expected it to be with about 50 people voting so far. What I did not expect was that there would be one runaway leader at this point. One of the entries has an almost 2-to-1 lead over its nearest competition.

After these two big leaders, there are several other adventures racking up impressive voting. In fact, every single adventure has received at least one vote (and no, it's not just from the author).

I'm not going to taint the results by publishing who the leaders are, but I will publish the top five at this time (and they are listed in order of their publication number, which does not coincide with who's leading):
  • SS001 - Ambush at Coyote Canyon! by Al Theobald
  • SS002 - Bullets for Breakfast! by Ross Edwards
  • SS003 - 1,000 Horses for Helen! by Carmen Cerra
  • SS004 - Hurrahin' the Sky Pilot! by Dan Hash
  • SS005 - Holed Up! by Lance Gamble
If you don't see your favorite adventure up there, it's time to vote or stat campaigning to convince your friends and family to agree with your choice and get them to cast a vote, too.

You can read the adventures here: http://www.hawgleg.com/2007_contest_winner.asp
You can cast your vote here: http://www.hawgleg.com/polls_vote.asp?PollID=1

By the way, remember that everyone cast a a vote is eligible to win a saddlebag full of cool prizes!

Voters’ Drawing Prize (valued at about $60) Randomly selected from everyone who votes

  • Whitewash City Starter CD ($15 value) 
  • One item from the Gutshot General Store (approx. $20 value) 
  • One copy of the collected S&S paperback book (approx. $20 value)
  • Gutshot miniature: ($5 value)

See yuh back here on Thursday fer our next, 
regularly scheduled pow wow.

Thursday, March 15, 2012

Rules Q&A: Movement rates and attack modifiers

We got a question through the Hawgleg Website last week, and I reckoned it would be a good idea to share it with ya'll, in case this has caused any of you to scratch yer heads.

"When taking an action, I attack 1st then move, do I still apply applicable movement modifier to shot even though I moved after shooting?"

Movement and combat is definitely a tricky matter, and it can cause some headaches unless you pay particular attention to tracking the movement rates for all miniatures during the game.

To the question above, the short answer is no, you would not apply the penalty in that instance.  Let's break it down:

  • Clem is running with a pistol in his hand down the street of the town because Jake is after him. Clem runs the full 12 inches and then stops. At this moment, until the start of his next action (when his name is pulled out of the hat) he is considered to be Running.
  • Jake's name is pulled from the hat. Since he has a rifle, he decides to Walk 3 inches and take a shot at Clem. Let's say they are 8 inches apart. Jake has a TN of 7 and rolls the dice and gets a 5. We now look at the modifiers: +2 for medium range with a rifle, but -3 because Clem is running. 5 + 2 - 2 = 5. It's a miss. Clem considers the range and modifiers and decides it's not worth it to waste the ammo (after all, with the rang
  • Clem's name is pulled from the hat. He is no longer considered to be running. In fact, as far as game play is concerned, he skids to a stop, turns around and takes a shot at Jake. Clem also has a TN of 7. Since he is no longer running, he does not have any movement modifiers. As for range, he is at 8 inches with a pistol, which puts him at long range and a -1 penalty. Jake is walking, so there are no movement penalties in that regard. So Clem rolls the dice and gets an 8. Looking at the numbers we see: 8 - 1 (for range) = 7: which means a hit! Clem rolls 1d6+1 damage and gets a 4.
  • Jake now decides to take his Retaliation Shot. Remember, Retaliation Shots are instantaneous -- so this happens before Clem can start moving again. Jake rolls a 5 (5 + 2 (range) = 7) and gets a hit! He rolls 1d6+2 for damage and gets a total of 8! Clem is now moderately wounded, which will affect his ability to move and shoot.
  • BUT, since all damage is applied at the END of the Action, it does not affect him right now. So Clem decides he'd better skeedaddle out of there as fast as he can, so he runs a full 12-inches away and hopes it's far enough to save his life, because now he's hurting.

Hope that answers the question. By the way, this might vary slightly from what you can read in the book. We've modified things since it was written, and subsequent editions and errata will correct that. The game is always evolving and this is how we actually handle this situation in games we play.

By the way, keeping up with movement can be a bit tricky, which is why we use red & yellow tokens under our minis to indicate movement. The yellow token indicates that the figure is trotting, a red token indicates he is running. This tends to help sort out a character's movement rate at any given time.


As you can see in this picture from an early playtest of Gutshot: Night of the Living Deadwood, two of the figures have reddish disks under them. These are used to indicate that they are running. The two figures (upper left) are on yellow disks to indicate that they are Trotting. Figures without any disks under them are Walking, and those three guys with the red splats under them are dead. Note that in the upper left corner it looks like two figures are on that one yellow disk (okay, it doesn't look that way, they are both on it), that's just because the zombie on the square base rushed the other figure and kinda knocked him off his disk. That sort of thing happens in games.

Although we do sell these tokens at our Website, you really can use anything you have on hand to help keep track of this. In a game with only a few minis, you can actually just leave it to memory, or have a notepad and jot down the current movement rate of each figure as it changes. But in a big, messy free-for-all like the one above? Movement tokens are probably the best way to go.


Hope this helps clear things up. See ya'll next Tuesday.

Tuesday, March 13, 2012

S&S: Why did it take so long? Part 3


The next gap is almost a year long, and it's harder to explain from the news headlines. I was almost put in the hospital again during that time, but was able to recover with bed rest. And Arnica started selling in earnest. And the 10th and 11th adventures we selected were BIG adventures. They were probably overly ambitious because they each included some really cool extras. Dion Duran's "I Hit a Vein!" has a PDF map for a poster-size underground gold mine that can be printed out, one page at a time, on your color printer. And Tom Reed's "White Water, Bloody Boulders!" comes with 13 pages of map tiles to simulate a wild escape on a white water rive raft. Both of these bonuses took extra time to flesh out... But I (for one) think the wait was worth it. These two adventure accessories will turn any game into an ace high fandango!

Remember, you can get all of these adventures for FREE over at our Website: http://www.hawgleg.com/2007_contest_winner.asp


The Last Hurrah
I think the hardest part to explain is the final big gaps. It took us almost a year to publish the 12th adventure, and then another year for the three of us to force the matter and actually vote on who won. That honor, of course, went to Tom Reed's "The Great Dry Gulch Bank Robbery!" Now, part of that delay did come from the fact that we had wanted to print a 13th adventure to make it a baker's dozen. But we finally realized that this had been sitting idle for far too long and we just had to end it. So, end it we did.

And then came the next delay, which is entirely on me. We needed to set up a software solution for people to vote on the winner of the Jury's Prize (that is to say, second place). The problem was, I couldn't find an available solution that we could afford (honestly $99 to run a contest for one month?). And the freebie solutions didn't have the functionality we needed to capture email addresses, or if they did, they limited us to 100 respondents. Since we couldn't find what we needed, we decided that I should write it myself.

The really sad thing is, I got about 80% finished with the coding and back-end tools in two weekends, and then my work schedule went crazy and my computer crashed (my work was safe online but I didn't have an ASP development environment set up on my new laptop). That's when things REALLY slowed to a snail's pace. Countless distractions and other issues just kept putting S&S on the back burner until -- you guys really should thank him -- Paul got me to focus on it again so we can finally put this puppy to bed.

And that's where we are: Finally putting it to bed after starting it five years ago. This puts us 3.5 to 4 years behind schedule. I've got to say... Hawgleg has the most patient fans on the face of the earth. I think they always knew we'd get it done... it was just a matter of when. And, of course, that "when" is now.


Putting it all into a nutshell
I've had time to think about what happened and why. There were some reasons for some of the delays, and hospitalization and hurricanes are darned good reasons as to why we got thrown off track. But (and you decide if this is a reason or an excuse), I think it comes down to this: We underestimated the time and resources we would need to complete all the projects we had lined up and, because of that, we lost momentum on the S&S contest. 

I think we've managed to lasso the momentum right now and will manage to keep it going for the last mile of this journey. We're going to get the prizes awarded and delivered to the patient winners. And then we're going to pull the material into a book for the people out there who would like to purchase a permanent hard copy for their records and, let's be honest, to give one final thrill and some serious bragging rights to the fine gents who entered this contest. When all is said and done, they will have their work printed in a game book that they can show off to their buddies and to woo the ladies (okay, I suspect it will be more showing off than wooing, but you never know...).

By the way, just because we are collecting the Showdowns & Shootouts material into a book does NOT mean we are taking the original adventures offline. Our intention is to keep those up there as free downloads for anyone who wants to mosey by and take a gander at them. After all it's taken to get them up there, it would be a downright sin to do anything else.

Tuesday, come back for a rules discussion on Movement & Modifiers. 

Thursday, March 8, 2012

S&S: Why did it take so long, part 2

I think we really started off well. I had the idea for the Showdowns & Shootouts contest in December 2006 and when I ran it by Murphy and Paul, they loved the idea. I then set about getting the prize support for it and together we worked up the rules and came up with the general guidelines of what we were looking for: Class adventure ideas that would be easy to play with 1-4 teams and didn't require strange miniatures or terrain. We also weren't looking for someone to write high-quality prose that fit our house style; we wanted basic ideas, character names and game set-up (maps, objectives, and other cool stuff). We wrote this up on our Website and opened it up to both the Gutshot community and the general public.

Our goal was always to collect at least 12 high-quality adventures and put them online where they would always be available as a free download as a PDF. The idea was twofold:

  1. It's a reward for the people who have already shelled out their cash to buy our book.
  2. Potential customers might read these adventures and think they were cool enough to invest in buying a copy of Gutshot. (Yes, we're nice guys, but we ain't averse to capitalism!)
When we started, we had no idea what kind of reception we would get. We needed at least 12 good adventures to complete the contest... and in the end, we hand danged near 50 submissions, and there wasn't a stinker among them! Every single person who submitted an idea took our guidelines to heart and wrote something that -- with some level of editing -- could be published as a quality game that would be fun to play. To put it mildly, the only hard part for us was agreeing on which adventure to print next.


The S&S Timeline
The contest opened on Jan. 31, 2007. Our goal was to have all of the adventures published by the end of that year and then wrap the contest up by the first quarter of 2008. As you can see, that did not happen. Here's a breakdown of the timeline, as culled from the Hawgleg Website's news archives:

  • Showdows & Shootouts writing contest offers more than $500 in prizes , Jan. 31, 2007
  • First Showdowns & Shootouts adventure ready for download, April 26, 2007
  • Bullets for Breakfast -- New Showdowns & Shootouts Adventure Online, May 25, 2007
  • Sawbones release Mitchell from Hospital, June 26, 2007
  • 1,000 Horses for Helen -- New 'Showdowns & Shootouts' adventure now online!, July 20, 2007
  • Fourth Showdowns & Shootouts adventure released, Aug. 15, 2007
  • Holed Up: New S&S adventure ready for download!, Oct. 4, 2007
  • 6th S&S Adventure: Stand-off at Muckhole!, Oct. 14, 2007
  • 7th Showdowns & Shootouts adventure ready for download, Jan. 8, 2008
  • New S&S Adventure Released, Feb. 25, 2008
  • Hawgleg Publishing acquires Arnica Montana Real Estate, April 28, 2008
  • Klaus needs a Holiday New Showdowns & Shootouts Adventure online!, June 8, 2008
  • Ike Strike -- Hawgleg suspends operations due to hurricane, Sept. 22, 2008
  • Hawgleg reopens after Hurricane Ike, Oct. 22, 2008
  • I Hit a Vein 10th Showdowns & Shootouts adventure released, Nov. 12, 2008
  • Hawgleg announces Draw! RPG, Feb. 5, 2009
  • 11th Showddowns & Shootouts Adventure ready for download, May 4, 2009
  • Arnica Pre-Release Bonanza Sale!, Aug. 12, 2009
  • Pre-Release Sale Closes, Sept. 12, 2009
  • Final Showdowns & Shootouts Adventure published!, July 13, 2010
  • Showdowns & Shootouts winner announced, June 19, 2011
  • Vote now in the Showdowns & Shootouts Contest, March 1, 2012
I've highlighted the 12 adventures' release dates in red.

As you can see, we did really well up until the sixth adventure, and even the seventh & eighth weren't too far off schedule, especially when you consider I spent about a week in the hospital in early 2007 and had a few subsequent relapses of a health issue that kept me bed ridden during that year. No, in spite of that, we were doing okay.

And then we bought Arnica Montana from Mike McGraw. Honest to gosh, we had no idea how much of our time and resources that would take up. This was new territory for us and we don't regret it at all, but it was something new and the learning curve was tougher than we expected. Being honest again, I don't think we're masters of this technology or business model even to this day. But that's another story.

By the Ninth Adventure -- Klaus Needs a Holiday! -- we were almost back on track, and then Hurricane Ike hit. My home was severely damaged and we were without power for 16 days. We left town for part of it (my folks up in the hill country had power and my brother was getting married, so what the heck, we rode out part of the aftermath with my kinfolk). And there was some serious aftermath. 

Hurricane Ike Damage

Yes, that is a tree on the side of our house. If you look closely, you can see the other tree that smashed the corner of our garage... tapping our cars inside (fortunately, our other cars were at my wife's folks' house, so we got a ride over there and were able to drive around the devastated city while Houston limped back to life.

Ike took a lot of wind out of sails and scuttled us for months (hmmm, maybe I should stick to Western lingo and say, this really put us off our feed). There was so much to deal with in the aftermath that we didn't even think about the contest for a while. Hawgleg actually closed for an entire month, and we didn't get our next adventure out until a month after that.


I wrap it all up next Tuesday in Part 3